安装 k8s
microk8s vs Minikube
虽然 Minikube 通常为 Kubernetes 集群创建一个本地虚拟机(VM),但是 MicroK8s 不需要 VM。它使用snap 包,这是一种应用程序打包和隔离技术。
这种差异有其优点和缺点。在这里,我们将讨论一些有趣的区别,并且基于 VM 的方法和非 VM 方法的好处。第一个因素是跨平台的移植性。虽然 Minikube VM 可以跨操作系统移植——它不仅支持 Linux,还支持 Windows、macOS、甚至 FreeBSD,但 Microk9s 需要 Linux,而且只在那些支持 snaps 的发行版上。支持大多数流行的 Linux 发行版。
另一个考虑到的因素是资源消耗。虽然 VM 设备为您提供了更好的可移植性,但它确实意味着您将消耗更多资源来运行 VM,这主要是因为 VM 提供了一个完整的操作系统,并且运行在管理程序之上。当 VM 处于休眠时你将消耗更多的磁盘空间。当它运行时,你将会消耗更多的 RAM 和 CPU。因为 MIcrok8s 不需要创建虚拟机,你将会有更多的资源去运行你的工作负载和其他设备。考虑到所占用的空间更小,MIcroK8s 是物联网设备的理想选择-你甚至可以在 Paspberry Pi 和设备上使用它!
最后,项目似乎遵循了不同的发布节奏和策略。Microk8s 和 snaps 通常提供渠道允许你使用测试版和发布 KUbernetes 新版本的候选版本,同样也提供先前稳定版本。Microk8s 通常几乎立刻发布 Kubernetes 上游的稳定版本。
但是等等,还有更多!Minikube 和 Microk8s 都是作为单节点集群启动的。本质上来说,它们允许你用单个工作节点创建 Kubernetes 集群。这种情况即将改变 - MicroK8s 早期的 alpha 版本包括集群。有了这个能力,你可以创建正如你希望多的工作节点的 KUbernetes 集群。对于创建集群来说,这是一个没有主见的选项 - 开发者在节点之间创建网络连接和集成了其他所需要的基础设施,比如一个外部的负载均衡。总的来说,MicroK8s 提供了一种快速简易的方法,使得少量的计算机和虚拟机变成一个多节点的 Kubernetes 集群。
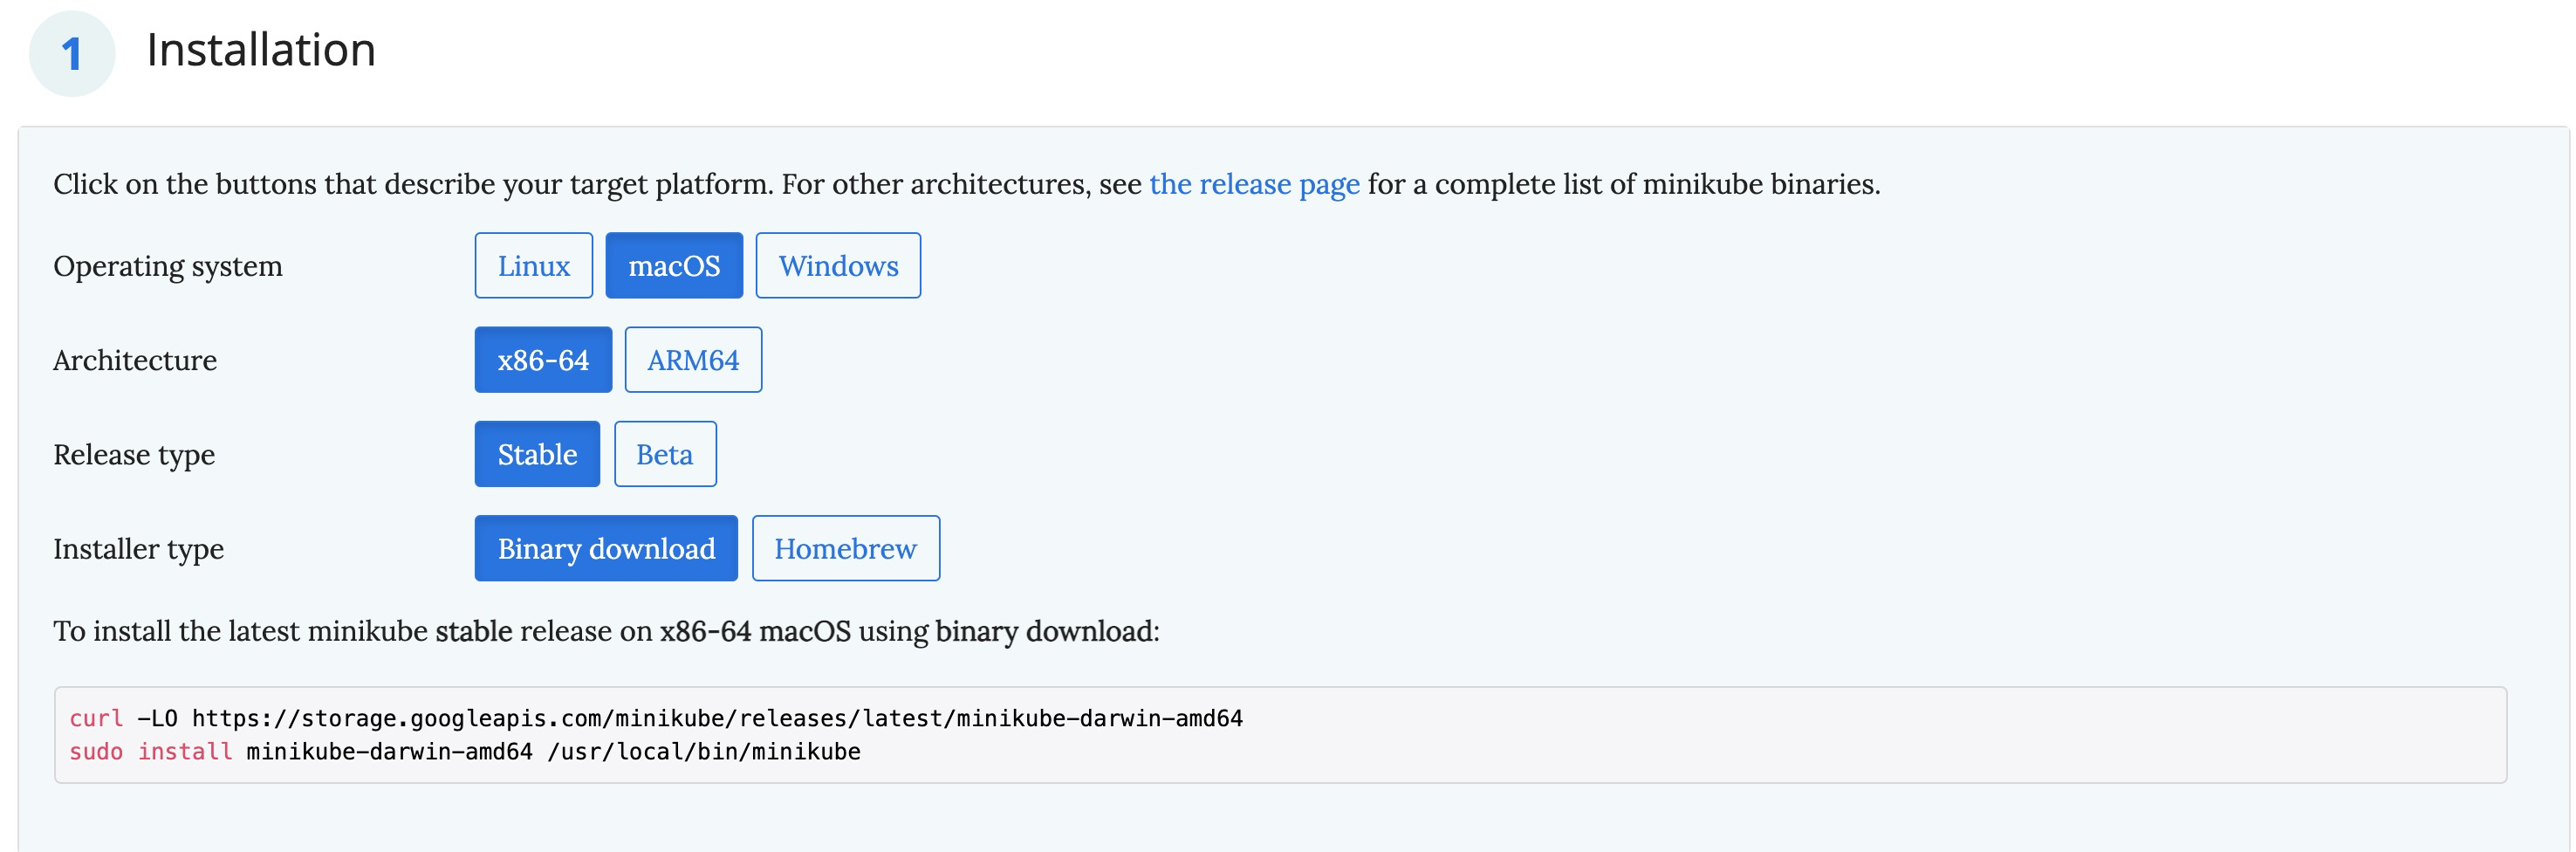
安装 minikube (for mac)
curl -LO https://storage.googleapis.com/minikube/releases/latest/minikube-darwin-amd64
sudo install minikube-darwin-amd64 /usr/local/bin/minikube
测试
minikube start
➜  ~ minikube start

😄  minikube v1.22.0 on Darwin 11.0.1
✨  Automatically selected the hyperkit driver. Other choices: vmware, parallels, virtualbox, ssh
💾  Downloading driver docker-machine-driver-hyperkit:
    > docker-machine-driver-hyper...: 65 B / 65 B [----------] 100.00% ? p/s 0s
    > docker-machine-driver-hyper...: 10.52 MiB / 10.52 MiB  100.00% 2.05 MiB p
🔑  The 'hyperkit' driver requires elevated permissions. The following commands will be executed:

    $ sudo chown root:wheel /Users/jansora/.minikube/bin/docker-machine-driver-hyperkit
    $ sudo chmod u+s /Users/jansora/.minikube/bin/docker-machine-driver-hyperkit


❗  Local proxy ignored: not passing HTTP_PROXY=http://127.0.0.1:7890 to docker env.
❗  Local proxy ignored: not passing HTTPS_PROXY=http://127.0.0.1:7890 to docker env.
💿  Downloading VM boot image ...
    > minikube-v1.22.0.iso.sha256: 65 B / 65 B [-------------] 100.00% ? p/s 0s
    > minikube-v1.22.0.iso: 242.95 MiB / 242.95 MiB [] 100.00% 4.68 MiB p/s 52s
👍  Starting control plane node minikube in cluster minikube
💾  Downloading Kubernetes v1.21.2 preload ...
    > preloaded-images-k8s-v11-v1...: 502.14 MiB / 502.14 MiB  100.00% 4.79 MiB
🔥  Creating hyperkit VM (CPUs=2, Memory=6000MB, Disk=20000MB) ...
❗  Local proxy ignored: not passing HTTP_PROXY=http://127.0.0.1:7890 to docker env.
❗  Local proxy ignored: not passing HTTPS_PROXY=http://127.0.0.1:7890 to docker env.
🌐  Found network options:
    ▪ http_proxy=http://127.0.0.1:7890
❗  You appear to be using a proxy, but your NO_PROXY environment does not include the minikube IP (172.16.217.9).
📘  Please see https://minikube.sigs.k8s.io/docs/handbook/vpn_and_proxy/ for more details
    ▪ https_proxy=http://127.0.0.1:7890
❗  This VM is having trouble accessing https://k8s.gcr.io
💡  To pull new external images, you may need to configure a proxy: https://minikube.sigs.k8s.io/docs/reference/networking/proxy/
🐳  Preparing Kubernetes v1.21.2 on Docker 20.10.6 ...
    ▪ Generating certificates and keys ...
    ▪ Booting up control plane ...
    ▪ Configuring RBAC rules ...
🔎  Verifying Kubernetes components...
    ▪ Using image gcr.io/k8s-minikube/storage-provisioner:v5
🌟  Enabled addons: storage-provisioner, default-storageclass
🏄  Done! kubectl is now configured to use "minikube" cluster and "default" namespace by default